

September 2025 update: This was originally posted to LinkedIn in March 2023, but I'm reposting it here to have most of my technical writing in one place.
August 2025 update: Sendgrid discontinued their free tier that I was using. I've switched to SMTP2GO for now.
Since I'm reviving my long dormant LinkedIn account, I thought I might start writing about some of the things I've worked with lately that I think are worth sharing. So let's talk about email standards.
Authenticating a vanity domain for free
In my last job I learned about and implemented various email authentication standards. These standards were mostly new to me since the last time I worked with email, so I had to do a little catching up to the new industry best practices. But the nice part was that they're based on DNS, and that's something I'm very comfortable working with (I used to regularly edit BIND zonefiles by hand in vim, but these days I'm primarily using Google Domains for my DNS which seems to provide a nice interface for managing everything).
Obviously I wanted to experiment with them on my own (very low volume) vanity domain. Here's how I configured DMARC, SPF, DKIM, STS and TLS-RPT, with monitoring services and STS policy hosting all done for free. The only cost was what I was already paying for my Google Domains registration.
I used to be all about setting up my own servers. I'd host some on my DSL or rent rack space from a local colo for others. But these days it's so much easier and cost effective to simply use SaaS providers for most things (and cloud computing otherwise), so that's what I'm doing:
- Google Domains (already $12/yr, but nothing extra)
- Gmail (free)
- SendGrid (free)
- dmarcian (free)
- GitHub (free)

And before getting started, there are lots of great online tools to help you craft these policies and records, and validate them once you've made them.
Without a doubt, MXToolbox SuperTool can do far more than any of the others I'm aware of. Use that to validate your policies and records every time you update one. There are just so many different things it can inspect for you and help you catch any problems before they have an impact.
Email Hosting
My domain is currently registered through Google Domains for $12 per year, which is reasonably priced, and more featureful than some of the competition, so I'm happy with it for now. Most importantly for this article, it includes free MX/forwarding (up to 100 aliases including wildcard addresses).
So go into Google Domains > [your domain] > Email. In the "Email Forwarding" section click the Add email alias link to create your desired alias and forward it to your personal inbox.
[*] I'm obviously using Google Domains and Gmail in this example, but you should be able to effectively do this in any of their alternatives too, of course.
Now any email sent to that alias in my domain will automatically go straight into my personal Gmail Inbox, but I also want to be able to send from those addresses of course. This is where SendGrid comes in.
SendGrid is designed as a mass email marketing platform, but it has a free tier that supports APIs, SMTP Relay and up to 100 emails per day, which should be more than enough for a vanity domain. So create your SendGrid account, then go to Settings > Sender Authentication and follow their steps to authenticate your domain, in which they'll prompt you to create three CNAMEs. Mine look like this:

Now go to Settings > API Keys and click Create API Key, enter a descriptive name, select "Restricted Access", and make sure it has the "Mail Send" permission granted. It will then show you the API key that was generated.
⚠️For security reasons SendGrid will never show you this key again, so you should store it somewhere safe like a secure password manager!
Now we can configure Gmail to use SendGrid. Go into Gmail > Settings > Accounts and Import. In the "Send mail as" section, click Add another email address.
Enter the alias you created in Google Domains, click Next step and fill in these settings:
- SMTP Server: smtp.sendgrid.net
- Username: apikey
- Password: <the Sendgrid API key we just generated>
- Port: 587
- Select: Secured connection using TLS (recommended)
Then click Add Account to finish. Back on the Accounts and Import screen, you can also make this address your default sending address if you like.
And that's it, Google Domains is already forwarding incoming emails to your Gmail account, and now your Gmail account is securely connecting to SendGrid to send outbound messages from your domain.
And the sent emails are already passing SPF & DKIM! I'll show you how that happened next.
Outbound email
The main standards here are DMARC, SPF, and DKIM, where DMARC is basically a wrapper to combine the other two.
SPF
SPF is essentially an allowlist for receiving mail servers to validate that the sending server is authorized to send messages for your domain.
Remember when SendGrid had me create three CNAMEs in my domain? One of them was em8798.trelvik.net. You can actually do several types of DNS lookups on that name:
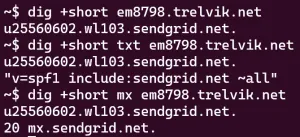
As you can see, the name itself is a CNAME pointing to a SendGrid hostname.
But the really clever part is that you can also lookup a TXT record, and see that they use it to specify an SPF policy for the em8798 subdomain:
"v=spf1 include:sendgrid.net ~all"
And you can query for an MX record and see that they've also configured the em8798 subdomain to use SendGrid for inbound emails.
20 mx.sendgrid.net.
All that with just a single CNAME, it's actually pretty elegant.
Now, my messages are being sent from Gmail through SendGrid, but my recipients only see "From: My Name <alias@mydomain.com>", which is what we want.
If you look at the full headers, you can see a Return-Path header using em8798.trelvik.net, and receiving servers will check for an SPF record on that subdomain, find one and validate it. So it's passing SPF with that subdomain, but recipients never need to see it, they only see the main alias I've configured.
Using that subdomain for the Return-Path is also important for receiving and processing bounce messages, and the MX record directs those messages to SendGrid so it can see if there was a problem sending.
DKIM
The other two CNAMEs that SendGrid had me create, s1._domainkey and s2._domainkey, both point to the DKIM keys SendGrid will use.

Whenever a message is sent through my SendGrid account, SendGrid will sign the message with one of the corresponding private keys, and the receiving mail server will look up these public keys in my DNS to validate the DKIM signature.
That was easy.
DMARC
DMARC basically extends SPF & DKIM by letting the domain owner specify a policy for how receiving servers should handle authentication failures, and create a reporting mechanism for receiving servers to provide DMARC data to the domain owner.
The reports will be in a relatively simple XML format. While you can manually look at and make sense of very small volumes of these reports, I strongly recommend you use a DMARC service to help aggregate all the data.
I've been using dmarcian, which has a free tier (for personal use only) for up to 10,000 messages per month, but there are others with free tiers as well.
Once you create your account and add/verify your domain, you can publish your first DMARC policy as a TXT record called _dmarc in your DNS. They'll give you an email address you can have your reports sent to.

The p=none; is the DMARC policy you always start with. A policy of none just means that receiving servers should not enforce any policy on messages from your domain. They will only send you aggregate DMARC reports about your domain to the mailto URI specified in the rua field. This is important if you have any other legitimate sources sending email from your domain. You want to verify that your DMARC compliance is at or very near 100% for all of your legitimate email sources before enforcing a DMARC policy. (For a vanity domain you may only have a single valid source, but in a corporate environment you'll typically have many, so this part is much more important there).
After monitoring your report data for at least a couple weeks, if you're confident all your legitimate email sources are correctly configured to pass DMARC, you can change your policy from none to quarantine or even reject. Quarantine tells receiving servers they can still accept the message, but treat it as suspicious (likely delivering it to the Spam folder), and reject tells the receiving server to outright reject messages that fail DMARC.
Some receiving servers may choose to ignore the policy and deliver it anyway, but a policy of quarantine or reject is still a strong indicator that your domain's valid email can be reliably authenticated, and should give your domain a better sending reputation with mailbox providers, and therefore better inbox placement (less likely to be filtered as spam).
And that's it, you're now responsibly authenticating and monitoring outbound emails from your domain, enjoying better deliverability rates, and are able to detect any sudden surges of messages failing DMARC (either indicating illegitimate/malicious sources or a configuration problem for you to solve).
Here's the key line from the headers of an example message sent this way:

You can see that it passes DKIM with both the trelvik.net and sendgrid.info domains (though the latter doesn't help DMARC because it fails alignment, I'll dig deeper into that in a later post), SPF passes with the em8798.trelvik.net subdomain, and thus DMARC (with policy QUARANTINE) passes for trelvik.net. 🎉
Bonus: BIMI
Once your DMARC policy is set to quarantine or reject, you could even configure BIMI to get your trademarked logo displayed next to your messages in the inbox of many mailbox providers.
That doesn't make any sense for vanity domains like we're discussing here, but when getting your business domain email in order that would be the next logical step. It may further improve your domain's sending reputation and deliverability, and it will definitely boost your message's visibility in recipients' inboxes (where supported).
Inbound email
One last thing we can do to secure our email infrastructure is to set up reporting and a policy to prevent what's known as a TLS downgrade attack, where an attacker prevents SMTP servers from establishing encrypted TLS connections between each other, allowing the attacker to monitor and potentially modify messages in transit.
The main standards here are TLSRPT and MTA-STS.
TLSRPT
First we'll create a TLSRPT record in DNS that tells other SMTP servers to send us reporting data similar to DMARC reports. I also feed these reports into dmarcian.

Now sending servers can report any problems establishing TLS connections when delivering mail to my domain. I can go to dmarcian's TLS Reporting page to see my TLS data in graph and table form. Obviously we want to see a "Failure Count" of zero:

(like I said, it's a really low volume domain)
MTA-STS
Finally, let's create an STS record and STS policy telling servers what to do in the event of a STARTTLS failure.
Sidenote: the people who designed this are certainly far more knowledgeable on the topic than I am, so I'm sure they had their reasons for making the design decisions they did, but it seems to me like this is far more complicated than it needed to be for some reason. (The answer is probably laid out in RFC 8461, but I haven't read it yet, so that's admittedly on me.)
Instead of putting the policy in a TXT record like both SPF and DMARC do, you create an _mta-sts TXT record that only stores an "id" to indicate the version of your policy file (reminiscent of having to manually update your SOA record every time you edit a zone file).
Every time you update your policy file, you also have to come edit this record with a new ID number (a date/time stamp is typically suggested).
Then you're required to host the policy itself in a .txt file at a specific https URL (mta-sts.[yourdomain]/.well-known/mta-sts.txt) so it requires web hosting with a valid SSL certificate in addition to the DNS component.
Finally, the policy itself must list your MX servers authorized to receive inbound messages (though wildcards are permitted). So if your MX servers get updated in DNS, you'll need to remember to also go update your mta-sts.txt policy file to match, and then update your _mta-sts TXT record with a newer ID number to tell servers to grab a fresh copy of the policy file.
That just seems unnecessarily convoluted to me and a hazardous number of potential points of failure, both in terms of infrastructure and human error. But nobody asked me, of course.
Anyway, with that criticism out of the way, let's do this.
First let's get the policy file ready. I wasn't currently running a personal web server for anything else and didn't want to go to the trouble of setting one up for a single tiny text file like this, but I found a nice solution using GitHub Pages. User @jpawlowski developed a simple easy to use template. After clicking Use this template (not "Clone"), it sets the template up in a repository under my own account.
Now I do an MX lookup on my domain, to get the servers Google autoconfigured for my domain's MX, and add those to the .well-known/mta-sts.txt policy file like so:

You'll probably want a shorter max_age while initially testing, just in case, though it shouldn't matter as long as you're remembering to update your _mta-sts "id" (details on that part below).
The mode: testing is similar to DMARC's p=none. It tells other servers to continue reporting data to you (as configured in your above _smtp._tls record), but not actually block connection failures yet. Like DMARC, you'll want to monitor the reports in testing mode for a while before changing it to mode: enforce, just to make sure you're ready to start enforcing a policy without risking delivery problems.
Now go back to your DNS and create another CNAME pointing the hostname mta-sts to <your_github_username>.github.io.
Back in GitHub, go into your repository Settings > Pages and configure it to use mta-sts.[yourdomain] as a "Custom domain" (there's probably a domain verification step first, but I don't recall the specifics).
Be sure to enable "Force HTTPS".
Once that's all set up you should see something like this:

And be able to click that link and be taken to your mta-sts.txt file:

Finally, once that's all ready, go back to your DNS to create your _mta-sts record:

And that's it. You now have a _smtp._tls TXT record directing TLS reports into your dmarcian account, GitHub is hosting your mta-sts.txt policy file, and your _mta-sts TXT record tells servers if they should check for a new version of your policy file.
You've now improved your security for inbound messages as well, congrats.
Recap
- Google Domains is managing your MX records and forwarding inbound messages into Gmail (or other mailbox provider)
- Gmail is configured to use SendGrid SMPT servers for outbound email
- You set up 3 CNAMEs for SendGrid: 2 for DKIM keys, and 1 for SPF/MX
- Your _dmarc TXT record contains your DMARC policy and directs DMARC reports to be sent to your dmarcian account
- You created mta-sts CNAME pointing to a GitHub repository hosting your mta-sts.txt policy file
- You created a _mta-sts TXT record to indicate the version ("id") of your policy file, and a _smtp._tls TXT record directing TLSRPT data into dmarcian
That may have seemed like a lot as I explained it all, but in the end it's literally just 4 CNAMEs and 3 TXT records in DNS, plus a .txt file on a web server, in order to vastly improve your email deliverability and and keep your domain's email looking much more professional than the free webmail account you're using behind the curtain. 😉

